- DCEmu Network Home
- DCEmu Forums
- DCEmu Current Affairs
- Wraggys Beers Wines and Spirts Reviews
- DCEmu Theme Park News
- Gamer Wraggy 210
- Sega
- PSVita
- PSP
- PS5
- PS4
- PS3
- PS2
- 3DS
- NDS
- N64
- Nintendo Switch
- Snes
- GBA
- GC
- Wii
- WiiU
- Open Source Handhelds
- Apple Android
- XBOX360
- XBOXONE
- Xbox Series X
- Retro Homebrew & Console News
- DCEmu Reviews
- PC Gaming
- Chui Dev
- Submit News
- ContactUs/Advertise
Search DCEmu |
Social Media |
|
Facebook DCEmu Theme Park News Wraggys Beers Wines and Spirits Youtube Wraggys Beers Wines and Spirits DCEmu Theme Park News Videos Gamer Wraggy 210 Wraggys Beers on Twitter Wraggys Beers on Instagram |
The DCEmu Homebrew & Gaming Network |
|
DCEmu Portal |
DCEmu Newcomers |
||||||||||
|
||||||||||
|
PSP News is a News and downloads site for the Playstation Portable, We have all the latest emulators, homebrew, commercial games for the PSP and all the downloads on this site, we also cover commercial gaming and console news. Part of the DCEmu Homebrew & Gaming Network. PSP Homebrew and Hacking Pages DVD To MP4 Guide By Engadget This week’s How-To is only going to apply to the lucky six or seven
of you who’ve managed to already get your hands on a PSP, the rest
of you will just have keep this one in mind and come back to it when the
PSP comes out here in the States in March. We’re going to show you
step-by-step how to get video clips on to your PSP without having to spring
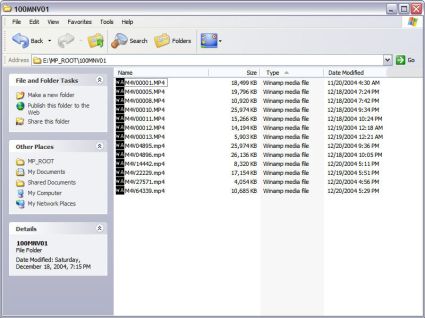
for any additional software. Just create a new folder in the root directory named MP_ROOT, and then make a folder called 100MNV01 in there. So your .MP4 files should go into E:\MP_ROOT\100MNV01, where E:\ is the drive letter of your Memory Stick. You also need a PC, as the converter software does not work with Macs. This MP_ROOT directory structure is directly cribbed from Sony’s UX/VZ Clie PDA series, which also plays MPEG-4 videos. Sony does offer up Image Converter 2.1, but they charge 1000 yen (around $10) for it. We’re going to show you how to do it for free. First, we need to download 3GP Converter, currently in version 0.25 in our download section. 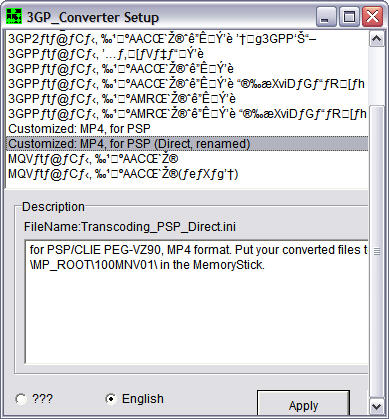
Unzip the 3GPC .ZIP file into a directory of your choice, and run setup.exe.
You may see a bunch of weird characters, but don’t worry, it’s
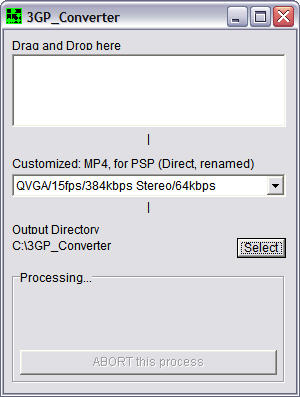
set to Japanese by default. Scroll down to the bottom of the 3GP Converter
Setup window and select the English radio button, select Customized: MP4,
for PSP (Direct, renamed) the then press Apply. This is the setting for
conversion of video files to MPEG-4 format that can be played by the PSP,
and renamed so your PSP recognizes it (such as M4V31337.MP4). Unfortunately,
the PSP currently won’t recognize file names such as TheUsualSuspects.MP4
or TheOCSeason2Episode4.MP4.
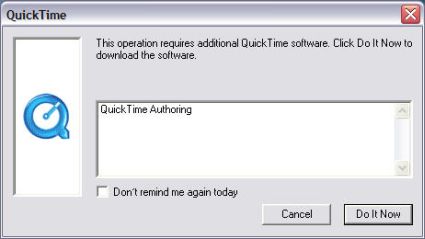
The program may ask you to install QuickTime Authoring before being able
to convert your video files. A simple click of the Do It Now button will
suffice.
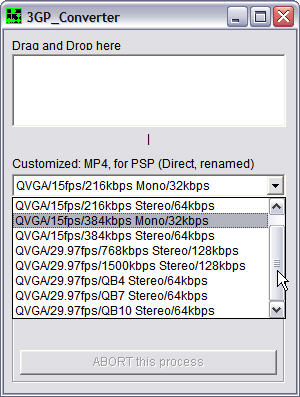
The drop down box is what level quality setting you want your MP4 video
to have. All outputted videos will have QVGA (320x240) resolution. You can
choose from 15 or 29.97 frames per second, with 29.97 fps being a lot smoother.
The third item listed in the quality settings is the video bitrate, the
higher the bitrate, the better quality your video will turn out, with the
highest quality being 1500kbps. The QB# settings appear to be variable bit
rate (VBR) settings, where the converter will use a higher bitrate when
necessary. The QB4 setting is the lowest quality VBR option, and QB10 the
highest quality VBR. Next is the options for audio, choose between Mono
or Stereo. The last bitrate is for your audio quality, you can choose from
32kbps (lower quality) to 128kbps (highest quality). The higher quality
setting you choose, the slower it will be to convert.
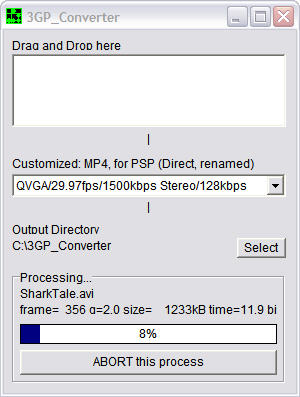
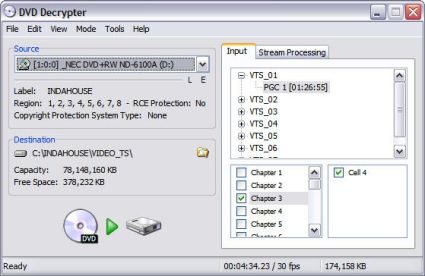
Now setup the USB connection (or take out your Memory Stick Pro Duo and stick in a reader) on your PSP to copy the video files over. The correct folder name for videos is E:\MP_ROOT\100MNV01 (where E: is the drive letter of your PSP). Copy your .MP4 video(s) over (the .THM files that 3GP Converter creates are not necessary for playback), and then disconnect the PSP USB connection by pressing the X button. Scroll over to Video in your PSP menu and select it by pressing the O button. It should list your converted MP4, with title, date, and length of video. Press O again and it will start playing There are four screen display modes, which you can choose from by pressing the triangle button. Scroll up to Screen Mode (2nd from left on the top row) and use the O button to scroll between Normal, Zoom, Full Screen, and Original modes. Normal is fine for regular 4:3 show viewing, Zoom gives you a closer view of the center of the video, Full Screen is perfect for 16:9 widescreen videos, and Original looks like it displays the video in a 320x240 pixel format. With the codec and video expertise of our favorite geek friend, Craig, we tried to convert a video into MPEG-4 format with a 480x272 resolution, which is the native resolution of the PSP LCD. A 480x272 video file should be of higher quality than a stretched 320x240 pixel picture, but unfortunately, all of our attempts failed, no matter what we tried. We would always end up with Incompatible Data or Corrupted Data displayed on our PSP, though it played perfectly on a Windows box. We came up with the theory that as the PSP uses the same video format as their Clies, and since those play videos just fine Sony didn’t want to put in the extra work involved to get native 480x272 resolution MPEG-4 support. We also guessed that any potential UMD movie titles would be shown in the full 480x272 resolution (just as games are in shown in the native screen resolution), but that Sony didn’t want to have videos from Memory Sticks (potentially copyright infringing) to be competing with the UMD discs which they would be making money from. In effect, they crippled the video playback capability from Memory Sticks. This is of course, just speculation, but this is Sony that we’re talking about here. Using a Dell Inspiron 8600 laptop with a 2 GHz Intel Pentium M processor with 2GB of RAM, we processed a few video files for fun. It took 3GP Converter 1:40 for a 18.5MB .WMV (of the Pistons/Pacers fight) to be converted into .MP4 format, with an output file size of 19.8MB for QVGA/29.97fps/1500kbps Stereo/128kbps, the highest quality available. It took just 48 seconds when we dropped down the quality level to QVGA/15fps/216kbps Mono/32kbps, with a resulting filesize of 3.2MB. There is a noticabe difference in quality, with the lower video bitrate resulting in annoying pixilation (which we hate). If you can spare the space, definitely go for the higher quality. We still think the holy grail of a portable video player is drag and drop support for all major video formats without any transcoding necessary. Converting video (just like converting MP3s to ATRAC in previous Sony music offerings) is just a pain and should be avoided if at all possible. This current way to put videos on the PSP is also a somewhat of a burden, as the process is more for the hacker type (and we mean hacker as in tinkerer). Sony has released Image Converter 2.1 (available for 1000yen), which has an iTunes-like drag and drop functionality, converting videos, renaming it, and putting it in the correct directory. We have heard a few reports of the software bloating a video file on conversion (turning a 20MB file into 30MB or bigger for no reason). We have no first-hand experience yet with the Sony software, but the 3GP Converter is quite adequate in its own right, with a host of encoding quality options. The converted videos using the QVGA/29.97fps/QB10 Stereo/64kbps mode (we assume QB10 is the highest quality variable bitrate mode, as QB4 video was loads worse) looks good in terms of video, but since the audio bitrate is half of the highest quality video’s 128kbps, you do notice the difference in audio quality, with the 64kbps audio being more hollow sounding and tinny. The filesize of the QB10 setting was 14.2MB, offering a bit of filesize saving over the 19.8MB of the 1500kbps video quality setting. We successfully converted Windows Media Player (WMV), MPEG-1/2, DivX, and XviD formats into PSP-capable MP4. Of the various formats we tried, only a Quicktime MOV file failed to be converted by 3GP Converter. Here’s a quick guide to convert parts of a DVD into MPEG-4. You can convert movies into MP4 format, but unfortunately, you will not be able to get a full movie to fit onto a 512MB Memory Stick unless you are willing to take a serious hit on video quality. What can work well is converting TV or anime episodes (30 minute or hour shows) from DVD, but any converting of clips 30 minutes or more will take quite a bit of time. First, decide what part of the DVD you want converted by previewing it in a standalone player or in a Windows DVD player. Write down the corresponding chapters which contain the episode or section you want. You will need DVD Decrypter. After installing the program and running it, we will need to set the program to IFO Mode, select Mode, then IFO Mode.
You will now see the Input window with VTS and PGC sections. Below that is a checklist of Chapters on the DVD. Check off the chapters you wrote down earlier and then click on Stream Processing. For simplicity, we checked the video stream, one audio stream, and one subtitle stream. Now that we have selected all that we want to rip from the DVD, click on the DVD disc to Hard Drive icon. The time for the ripping process will depend on the speed of your DVD-ROM, but in the meantime, grab Auto Gordian Knot. http://www.free-codecs.com/download/AutoGK.htm
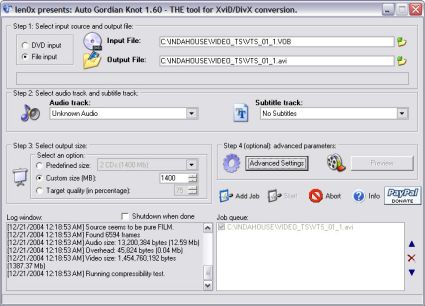
We will need Auto Gordian Knot (AG Knot) to convert DVD Decrypter’s VOB file into AVI format. After installing the program and some associated programs, we can load it up. In Step 1, select file input, for Input File, put in the VOB file from DVD Decrypter. For output file, choose a filename and location to place it. Select the audio track from the drop down box, and choose subtitle if need. For the output size, choose Custom Size. We got a 166MB VOB file in our 4 minute, 30 second clip from Ali G’s Indahouse from DVD Decrypter. So to be safe, we put in a 83MB output filesize, half the size of the original VOB, just to be safe. Then we clicked Advanced Settings and changed the Fixed Width to 320, as the PSP MPEG-4 video format is 320 pixels wide. Now click the Add Job button and the Start button (below Step 4). After conversion, use the above 3GP Converter guide to convert the AVI file from AG Knot into MP4.
The Hottest DCEmu Posters |